The Process
I'm often asked how I make these sculptures, what materials I use and how I cure the clay.
The process is very simple, the materials are cheap and easy to access and if you've got an oven, you can make them too.
Here's how:


Studio Insight: How to Sculpt a Donkey
From Armature to Completion.
A step-by-step look at how I make a polymer clay piece, including tools, clay prep, sculpting, curing and finishing off.

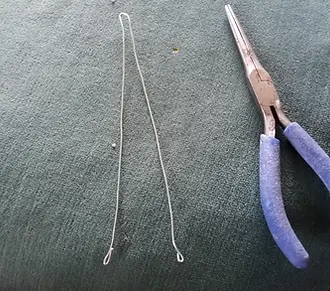
01
Gather together: wire, pliers, silver foil and photographs of the donkey you want to make.
02
Roughly work out how long the legs are in relation to the donkey's length. You'll need 4 lengths of wire: One length for the back/neck/head and tail. One length for both the front legs, one for both the back legs and one for the ears. (See photos)


03
DOUBLE the required length so you can fold each piece back on itself to double each strand - for strength and so that the silver foil holds firmly in place. (see photo). Cut the wire and immediately turn all the sharp ends over on themselves so they don't scratch you.
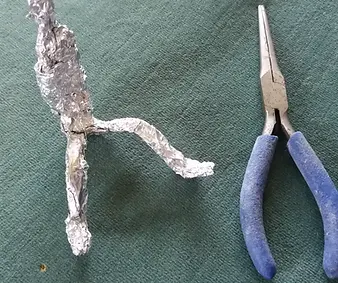
04
Wrap the strip of doubled wire that's going to be two legs, around the strip of doubled wire that's going to be the head/neck/back/tail and repeat for the 2nd pair of legs.
Wrap all the wire in foil, bend it, shape it and have fun .


05
Gather together: Rolling pin, pasta maker, Super Sculpey clay. (Pink Super Sculpey is soft and easy to work, grey is firm and holds detail best. You can use both types on one sculpt).
06
Prepare polymer clay by rolling it out with rolling pin to soften it, then by passing it through a pasta maker.

07

Wrap those pieces of clay around the foil covered wire and shape.
☆ Use 1/4 inch thickness of clay, to ensure complete coverage of foil.
☆ Bulk up the thicker areas using extra foil not extra clay.
☆ Crumple up the foil before putting it on the wire so the clay has something to grip on to.
☆ Use your hands and any tools you like for shaping. If the piece is small, dental tools are good. You'll find them on sale on line when you buy your Super Sculpey clay and liquid clay.
08
Cure completed sculpture in a regular kitchen oven at 130° for an hour-ish, depending on the thickness of the clay - (check times on packet).
You can't over-cure, longer baking just darkens the colour. You can under-cure though, which'll leave the clay brittle and breakable.


09
Leave the piece in the oven to cool down before removing it.
10
Once you've baked it, if you want to add anything else to your piece, use the Super Sculpey liquid on the baked area and apply the fresh clay to that, curing it in the oven then, will bond the two together.


11
Once it's cooled, sand and drill if wanted (wear a mask and gloves and do these outside).
12
Use acrylic paint if you want to paint it.
It doesn't need varnishing.
Tip: The best online group for tutorials and advice on all things Super Sculpey is The Blue Bottle Tree.


"Gills figures are so full of life. They make you smile. Her wealth of experience in the equine world shows through in the donkey sculptures. You expect them to get up and shake after they have rolled."
──
Nicola | Equine Therapist
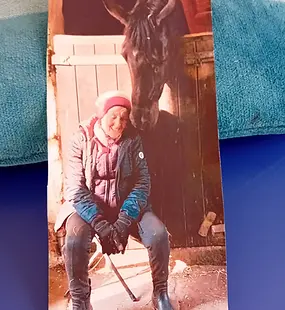
Shirley & Eva the Horse: A 90th Birthday Surprise
A step by step description of how I constructed and sculpted Shirley's 3d 90th birthday gift from a photo of her with Eva - her daughter Gina's beautiful black dressage horse.
01
First I made a large copy of the photograph I was sculpting and got as many photographs of Shirley and Eva - the horse, as i could get together. Though the sculpture is sitting in a recessed space, it's still a 3d sculpt and to do these, you need as many photographs of the subjects from as many different angles as possible.
02
Next, I made a deep box into which Shirley and Eva will be placed. The box is made from wire and foil, completely covered with supersculpy clay and smoothed flat. I left this unbaked so I could sculpt stone onto the surface and paint it before curing it in the oven - a good tip, it helps the paint bind to the clay better than if it was painted after curing.


03
Next I made 2 long thin strips (out of wire, silver foil and clay) to represent the sides of the stable and set them down on both sides of the box ready to sculpt stone and brick in to the surface (one side of the real horse's stable is brick, the other is stone - which i didn't fully understand until I visited the stable after I'd given Shirley the sculpture).
04
I then made the stable door out of foil first, to get the right size, which I then wrapped round that square piece of wire that you can see in the photo, before covering it with clay. I used thick wire here as I needed to make the door solid enough to support the weight of the horse's head which must be reaching over the door to nuzzle Shirley's neck. Aw!

05

Next I made a basic figure of Shirley from wire and foil, covered it in clay and then spent days struggling to get a likeness - which kept coming and going with even the tiniest of changes - the smaller the sculpture, the harder it is to get a likeness as even miniscule changes to facial features become major changes because the sculpture's small! The dental tools really helped and also putting the figure in the fridge for and hour at a time to cool down, made it easier to sculpt - it was a hot week.
06
Once I'd finished sculpting Shirley, I baked and sanded her.


07
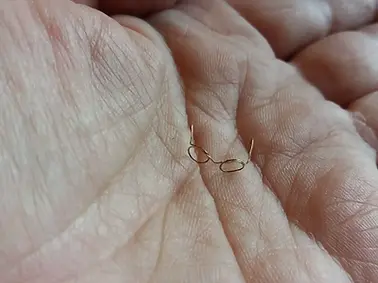
Next I sculpted the stable door and baked it seperately. The stable door bolts and hinges I also made separately and baked individually in the oven, (for about 15 minutes each) because i couldn't fix them in their places until everything else was ready to bake and had been positioned accurately. Also being so tiny, those bolts would have smudged with even the lightest accidental touch if I'd not baked them first, (that's one of the bolts, about to be sculpted, that's sitting in the middle of that plate in the photo!)
08
Next I made the horse's head and left a long chunk of unshaped clay at the base of the horse's neck (that wouldn't be visible in the finished piece). After I'd painted the stable and the horse, I would the be able to squeeze this long chunk of unshaped clay with the horse's head on the end, down behind the stable door and secure it in place with liquid clay.


09
I then painted the stable, the sides and the doors, sculpted the horse's back directly onto the stone background at the back of the stable and squeezed it into place behind the stable door.
10
Once in place, I joined the horse's back (that I'd sculpted to the back of the stable wall) to the horse's neck where it appeared over the stable door and painted over the join.


11
Using Super Sculpey liquid, I joined Shirley's face to the side of the horse's head, secured her on her stool, again using liquid clay, secured all the separate bolts and hinges in place and finally it was ready to bake in the oven to fix everything in place securely and complete the sculpt.
12
...or so I hoped!!
It was midnight the day before we were to fly to the UK for Shirley's surprise 90th birthday party. I'd spent a week on this sculpture which was to be her present and I'd not even started to pack for our trip in the morning when I suddenly noticed as I was gift wrapping it, that I'd forgotten to add the quarter of a millimetre of silver bolt to both the bolts on the right of that stable door. Can you spot them? Compare these 2 photos. The one above makes no sense - that door would not have been boltable in a million years. Cursing my perfectionism, the wrapping paper was put on one side and out came the clay, tools and paint again and back in the oven it went.
I went through airport security nervously carrying this extremely well protected grey coloured putty-like material with wire going through it, so I was glad I'd taken these photos to prove to the airport security I was nervous of dropping what was a precious sculpture, not a bomb! They let me through!


"I love it, and cannot believe how you've managed to get such a good likeness. Brilliant Gill, thank you so much, it has got pride of place on my mantle peace."
──
Shirley | Yorkshire, UK
The Bernie Series: From Meme to Figurine
When that meme of Bernie Sanders at Obama's inauguration was doing the rounds on the Internet, I made this painted Super Scupley figurine for my sister Lucy, as a gift. I liked him so much I decided to make a few more and send them to people who wanted to exchange one for a donation of €100 to UNICEF, in honour of Sanders' humanitarian work.
For anyone who wants to have a go at making a figurine, here's a step by step with tips and hints.

01
I got together as many photos of Bernie's face as I could, enlarged that image of him shivering in his mitts and kept them in front of me throughout each sculpt.
02
I cut one piece of wire twice the height I wanted the Bernie figurine to be and then folded the wire in half. Swiftly, I bent the 2 ends over on themselves so as not to scratch me as I wrapped the wire with silver foil.
03
This figurine was easy as Bernie was so cold that day, he was all hunched up with his arms wrapped tightly round his torso - a dream position for a sculptor! So I only had his torso, legs and head to gauge how much silver foil to wrap round the wire.
04
When I'd covered the wire and built up the middle, the bulkier bit, I wrapped everything but his head in gray supersculpy clay which had been rolled through a pasta maker. I then added the pink clay for his head and started sculpting - the fun bit. I used dental tools throughout, as the figurine is tiny - only a few inches high.

05
Each Bernie took several days to get to the point where I could focus on sculpting a facial likeness which was not too hard, given that half his face was covered with a covid mask. His glasses however were not so easy ... many hours spent straghtening individual strands of electrical wire that I pulled from cables that weren't running the tv, cd or kettle, or that I found holding something of Chris's together. It was a study of frustrated experimentation if I'm honest, every pair of glasses was fashioned in a different way. If you're going to have a go at this, keep a comfort blanket close to scream into and use a former to get the symmetry of the lenses. Other than that, good luck!
06
When it came to sculpting fine detail, despite the grey Super Sculpey being the firmer of the two types, I still found detail continually smudging if I "looked at it funny". So I took to putting them in the fridge every 20 minutes for 10 minutes to cool them down. It did the trick.


07
Baking sculpts is always scary even though nothing untoward has ever happened during the baking process. I suppose it's because it marks the decision that the sculpting work is done, no more messing, 'get it writ'.
08
I baked the first Bernie unpainted before I learned that painting them before baking them made the paint stick better to the clay. (Yes, it's perfectly safe to subject acrylic paint to 130° in a domestic oven - see The Blue Bottle Tree website).


09
I also varnished using a shiny varnish before I learned that varnish isn't necessary and should be tested before it's applied because they're not all necessarily matt! Duh! His shoes look nice and shiny but his trousers ... hmmmm!
10
I've since learned that it's probably more useful not to varnish Super Sculpey at all because it doesn't really provide much protection from chipping paint, plus if the sculpt were to break, you'd not be able to fix it by re-baking the piece because you can't subject varnish to 130°. Instead, if you had a break, you'd have to mend with Superglue, which would hold it ok, but you may see the join.

11

The paint to use is acrylic.
The chair Bernie sat on, I had many go's at. Rarely am I beaten into giving up. I tried lots of methods but just couldn't find the right material to make them, or indeed the time. But I imagine the Bernies would be happy enough to sit on their signed and dated bottoms, so I left them for owners to place him on their windowsills, bookshelves or shrines.
12
And that's how I made Bernie.

"On August 11, 2021 I received my Bernie Sanders! This small sculpture of Bernie, inspired by his memorable appearance at the presidential inauguration-seated in the cold with his signature mittens- is a remarkable work of art. The craftsmanship is exceptional, capturing both the likes and spirit of the moment with impressive accuracy and fine detail. Bernie was shipped from Kenmare, Ireland to Centreville, Virginia and arrived in pristine condition.
An added highlight was that it required a donation to UNICEF to purchase Bernie. I donated 100 euros to UNICEF making this sculpture not only a delightful collectible but also a purchase with a wonderful blend of art, humor and purpose!"
──
Cathy | Centreville, VA, USA
Working with Super Sculpey Polymer Clay
Why I love polymer clay. A guide to the material I use for my original models, how it holds detail, and why it is the perfect medium for intricate sculpture work.
01
Super Sculpey is a robust, inert polymer clay, commonly used for sculpting pieces small enough to fit in a domestic oven. It's safe to use and easy to work when it's warm and has been rolled with either a rolling pin or put through a pasta maker, or both.
02
To my knowledge there are two types of Super Sculpey - grey for fine detailed work and pink for less detailed work. You can mix the two.


03
Thickness is important. The ideal thickness of clay is about 1/4 inch - the bulk of the sculpture being made up of silver foil wrapped around a wire armature and shaped, over which the clay is then wrapped, shaped and sculpted.
04
Liquid clay can be used to bond a fresh piece of clay onto a baked/cured piece of clay. This enables you to bake half way through a project to preserve what you've just made, safe in the knowledge it won't be spoiled by accidentally smudging detail.
Once it's cooled down after baking, you can resume the project, adding more clay to the piece using Liquid clay to bond it and baking it again when complete. You can bake the piece as often as you like.


05
Super Sculpey is baked in a kitchen oven at 130c. It gives off no dangerous fumes but I always like to air the kitchen during and after as it has a slight smell - it's not unpleasant though.
06
The length of time projects should be baked depends on whether you had to add more than 1/4 inch (detailed baking directions on packet). It's perfectly possible to add more but ideally not more than half an inch.


07
It's important to leave it in the oven to slowly cool down after which it can be sanded and drilled if wanted and painted with acrylic paint. No varnish is necessary.
08
Google Blue Bottle Tree for the best online tutorials on clay, tools, painting and troubleshooting. Ginger who is Blue Bottle Tree, is friendly, helpful and very experienced; she does endless experiments to fully answer all questions that people ask her and her site is now an encyclopaedia of Super Sculpey and well used for good reason. Recommend.

